

How to Prepare Your Property for Tree Removal: A Seamless 2026 Guide
- cdatreeu
- 4 hours ago
- 14 min read
Last week, a homeowner in Coeur d'Alene watched as a crane left deep, muddy ruts across their pristine lawn. It was a costly and frustrating outcome that could have been completely avoided with just 30 minutes of simple prep work. It’s a completely valid fear; you’ve invested years into your landscape, and the thought of heavy machinery causing preventable damage is a major source of stress. When you add the confusion over local permits and the worry about disturbing your neighbors, the entire project can feel daunting before it even begins.
That's why we've created this comprehensive 2026 guide. We're here to give you the confidence that comes with a solid plan. You'll learn exactly how to prepare your property for tree removal, ensuring your landscape is protected and the entire job is handled with professional efficiency. We will walk you through a simple checklist covering everything from clearing access paths to navigating Pacific Northwest regulations, making the process seamless from start to finish.
Key Takeaways
Understand how to map out a clear access path for equipment, ensuring a safe and efficient operation from start to finish.
Protect your landscape by defining a "drop zone" and applying the 10-foot rule to clear all portable items from the work area.
Navigate Pacific Northwest tree ordinances with confidence by learning your specific responsibilities for permits and neighbor communication.
A critical step in how to prepare your property for tree removal is establishing a strict safety perimeter and marking all underground utility lines.
Make informed decisions about stump grinding and debris management before the crew arrives to ensure your post-removal restoration goes smoothly.
Table of Contents Assessing Access and Equipment Requirements Physical Property Preparation: Clearing the Drop Zone Navigating Permits and Neighbor Relations in the PNW Essential Safety Logistics for Your Household Post-Removal Planning: Stumps, Debris, and Restoration
Assessing Access and Equipment Requirements
Before a single cut is made, the most critical phase of any tree removal project begins: a comprehensive site assessment. Think of this as creating a detailed 'Tree Removal Site Plan'-a strategic blueprint that ensures every step of the operation is safe, efficient, and protects your property. A successful removal isn't just about felling a tree; it's about meticulous planning that accounts for every potential obstacle. This proactive assessment is the foundation of how to prepare your property for tree removal without causing unintended damage.
The first step is to trace the journey our equipment will take from the street to the work zone. This isn't a casual glance; it's a detailed analysis of the path's suitability for heavy machinery. A standard bucket truck, essential for accessing tall canopies, can weigh over 30,000 pounds and requires a clear, stable path at least 10 to 12 feet wide. We also use machinery like skid steers for moving large logs, which, while compact, exert significant ground pressure. A professional arborist understands that these site logistics are fundamental to safe and effective arboricultural methods, ensuring every action is deliberate and controlled.
Here in the Pacific Northwest, this assessment is uniquely tied to our climate. From October through May, our soil is often saturated. This high moisture content dramatically reduces the ground's load-bearing capacity. Driving a 15-ton truck across a soft, wet lawn is a recipe for deep, costly ruts and potential damage to underground utilities. That’s why a seasoned local arborist will always evaluate soil conditions and may recommend scheduling the work during a drier period or implementing robust ground protection measures. It’s this specialized, regional knowledge that makes the process seamless from start to finish.
Mapping the Machinery Path
Creating a clear and safe route for equipment is a non-negotiable part of the plan. This involves a thorough inspection of the entire path, identifying and mitigating any risks before the crew arrives. We look for potential issues both above and below ground to prevent any surprises on removal day.
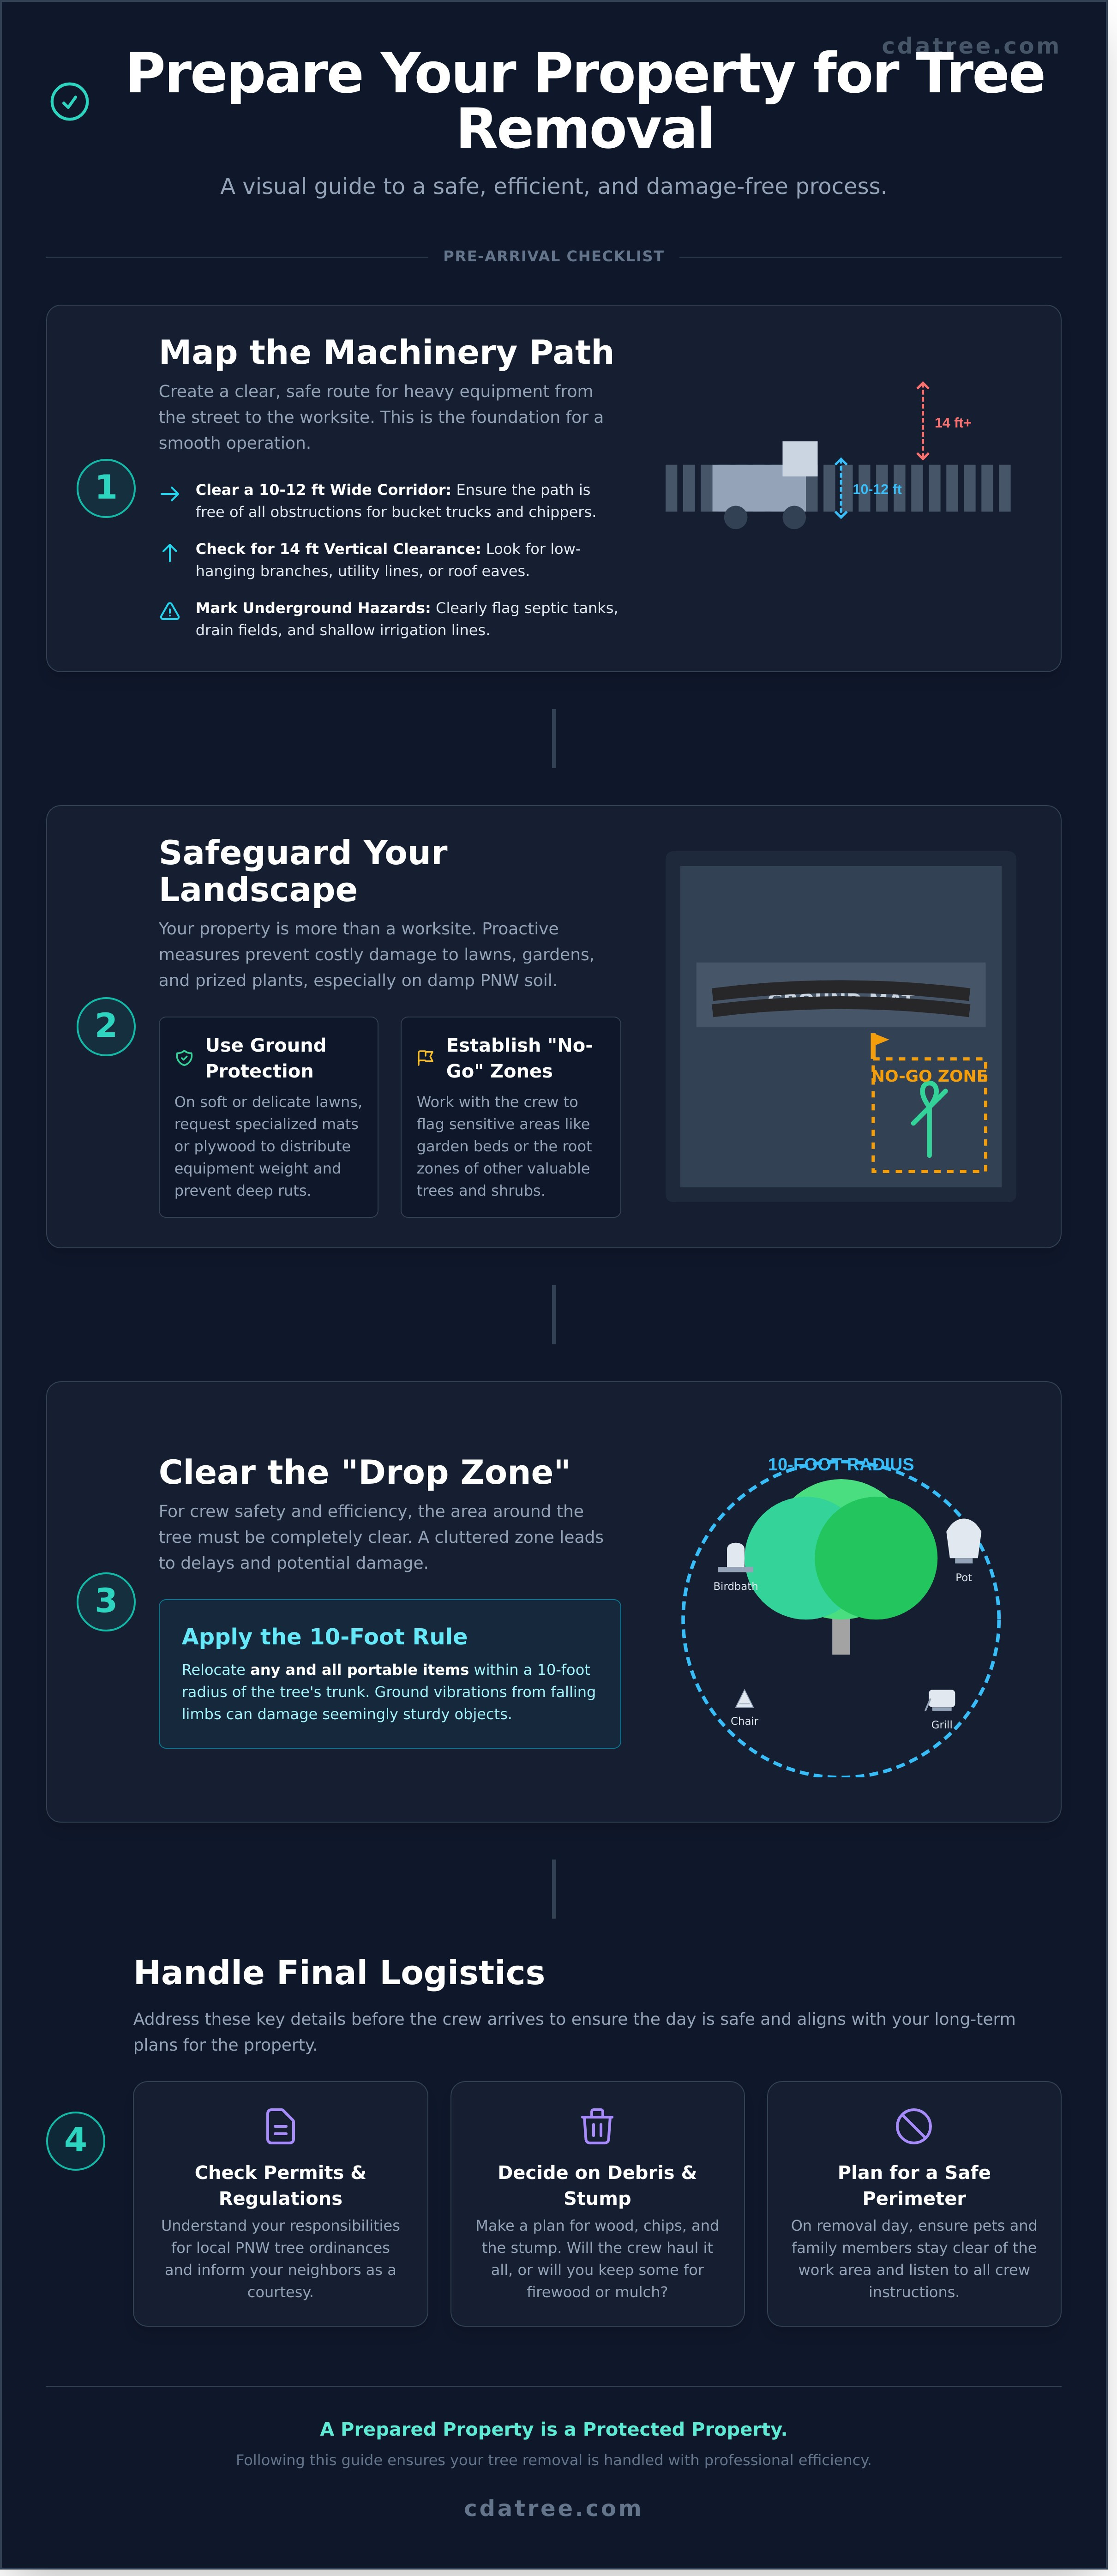
Establish a Clear Corridor: We'll identify a 10 to 12-foot-wide path, ensuring it's free of obstructions for our bucket trucks and chippers.
Check Overhead Clearance: Low-hanging tree limbs, utility lines, roof eaves, and decorative structures like pergolas or arches must be noted to ensure at least 14 feet of vertical clearance.
Identify Underground Hazards: We’ll ask you to mark the locations of known underground systems like septic tanks (often 10 feet from the foundation), drain fields, and shallow irrigation lines, which are typically buried only 8-12 inches deep.
Protecting Your PNW Landscape
Your property is more than just a worksite; it's your landscape. A key part of learning how to prepare your property for tree removal is communicating with your arborist about what needs protection. We are committed to leaving your property in excellent condition, which requires specific strategies for our unique PNW environment.
Ground Protection Systems: On damp or delicate lawns, we lay down specialized ground protection mats or heavy-duty 3/4-inch plywood. These materials distribute the equipment's weight, drastically reducing soil compaction and preventing turf damage.
Establish 'No-Go' Zones: We'll work with you to clearly flag sensitive areas. This includes delicate garden beds, the root zones of prized Japanese maples, rhododendrons, or any other cherished plants that cannot withstand soil compaction.
Communicate Your Priorities: Point out specific plants or landscape features that are important to you. Open communication ensures our team takes extra precautions to safeguard what you value most.
Physical Property Preparation: Clearing the Drop Zone
A crucial step in how to prepare your property for tree removal is establishing a safe and clear work area. We call this the 'drop zone.' This isn't just the single spot where the tree's trunk will land; it's the entire radius where our arborists will be working, rigging, and carefully lowering limbs. A clean drop zone is the single most important factor for an efficient and damage-free removal. It allows our crew to work without obstruction, significantly increasing safety and speed.
As a rule of thumb, we advise homeowners to follow the 10-foot rule: clear any and all portable items within a 10-foot radius of the tree’s trunk. This includes items you might consider heavy or sturdy. A solid concrete birdbath, for example, might seem immovable, but the ground vibrations from a 500-pound section of oak hitting the turf can be enough to cause cracks. It’s always better to relocate these items before our team arrives.
Relocating Outdoor Assets
Think of your yard as a temporary work site. Anything that could be damaged or get in the way should be moved to a designated safe zone, like a garage, a shed, or a distant corner of your property. This includes moving patio furniture, BBQ grills, and children’s play sets. You should also remove fragile garden decor like solar lights, ceramic gnomes, statues, and all potted plants. Finally, please ensure the driveway is completely clear so our chipper and truck have priority parking for safe and efficient debris removal.
Addressing Items Within the Tree
Objects hanging from the tree itself pose a direct risk to our crew and equipment. Before our arrival, please take a moment to remove any wind chimes, bird feeders, or decorative string lights from the branches. You'll also need to take down items attached to the trunk, such as rope swings, hammocks, or flag pole brackets. For any items attached to the tree that you cannot safely remove yourself, please mark them clearly with bright flagging tape so our crew can address them first.
While you handle the portable items, our team comes prepared to protect your fixed hardscapes. We understand your flagstone paths, retaining walls, and underground sprinkler systems are valuable investments. Our crew uses heavy-duty ground protection mats and strategic plywood placement to shield these surfaces from the impact of falling wood and heavy equipment. This meticulous approach is part of our commitment to a seamless and safe tree removal process, ensuring we leave your property looking its best.
Navigating Permits and Neighbor Relations in the PNW
A successful tree removal project isn't just about chainsaws and wood chippers. It's about careful planning that respects both local laws and your neighbors. In the Pacific Northwest, where we value our green canopy, cities from Seattle to Coeur d'Alene have specific regulations to protect significant trees. Overlooking this crucial step can lead to expensive fines and project-halting disputes. A key part of how to prepare your property for tree removal involves looking beyond your own fence line to ensure every detail is handled professionally and courteously.
The responsibility for legal compliance ultimately rests with you, the property owner. While a trusted tree care partner like CDA Tree and Utility will manage the permit application process for you, understanding the framework is essential. We see our role as your expert guide, ensuring the process is seamless from start to finish. This includes not just navigating city hall, but also fostering goodwill with the people who live next door.
Permit and Regulatory Check
Before any work begins, we verify local ordinances. For instance, the City of Seattle's Tree Protection Code (SMC 25.11) designates certain trees as 'Exceptional' based on species and size, often requiring a permit for removal even on private property. A certified arborist's hazard assessment is frequently required to justify the removal of such a tree. We ensure all approved permits and documentation are printed and clearly visible on-site, a non-negotiable step for any potential city inspector visit.
The Neighbor Courtesy Protocol
A simple conversation can prevent major headaches. We recommend notifying adjacent neighbors at least 48 hours before work is scheduled to begin. This isn't just polite; it's a critical project management step. Clearly communicate the timeline, potential for noise from equipment like stump grinders, and any temporary street parking that our crew vehicles may require. If access is needed via a shared driveway, discussing it ahead of time ensures a smooth, conflict-free workday.
What about trees on a property line? It's a common issue. In states like Washington and Idaho, the law generally allows a property owner to trim branches and roots that cross onto their property. However, if that trimming could harm the tree, you could be liable for damages. The best approach is always direct communication. If a neighbor's tree canopy overhangs your yard, or vice-versa, we can provide a professional assessment and help mediate a solution that preserves neighborly relations and ensures the health of the tree. This proactive approach is fundamental to how to prepare your property for tree removal without creating lasting friction.
Essential Safety Logistics for Your Household
A professional tree removal team brings the equipment and expertise; you manage the home front. Coordinating your household is one of the most vital steps in learning how to prepare your property for tree removal. A safe and efficient project depends on clear communication and establishing firm boundaries before the first cut is ever made. Our team at CDA Tree and Utility prioritizes a seamless process, and that begins with a well-prepared home environment.
The single most important rule on removal day is the safety perimeter. Our crew lead will establish a clearly defined 'drop zone' and work area that is strictly off-limits to anyone not on our team. This area is often much larger than you might expect, typically extending to at least 1.5 times the height of the tree to account for the unpredictable nature of falling limbs and debris. Heavy equipment like stump grinders and chippers also requires significant clearance. Your cooperation in keeping family and visitors out of this zone is non-negotiable for ensuring everyone's safety.
Before any heavy equipment rolls onto your lawn, it’s critical to account for what lies beneath. Even if we aren't digging deep, the weight of our machinery or the action of a stump grinder can damage shallow utility lines. State law requires you to call 811, the national "Call Before You Dig" hotline, at least 3 business days before the scheduled work. This free service prompts local utility companies to mark the approximate location of their underground lines for gas, electricity, water, and communications. A severed fiber optic cable, often buried less than 12 inches deep, can disrupt service for an entire neighborhood.
Tree removal is a loud operation. A professional-grade chainsaw operates at approximately 120 decibels, and a commercial wood chipper can be even louder. This level of noise can be highly disruptive, especially for infants, pets, or anyone working from a home office. Plan ahead by scheduling important calls for another time, arranging for a pet-sitter, or using noise-canceling headphones. Clear communication with our crew lead is the key to a smooth day. Before we begin, we'll confirm:
The designated crew lead and your single point of contact.
The exact sequence of the day's work.
The final, confirmed safety perimeter.
The estimated time of completion.
Managing Pets and Children
For their safety and peace of mind, all pets must be kept securely indoors or, ideally, at a separate location for the day. The noise and activity can be extremely stressful for animals. We also ask that you explain the dangers of the work zone to children and establish firm rules about staying far away from the activity. While we need gates unlocked for access, please ensure any gates leading to a yard where pets are secured remain closed and latched.
Utility and Service Coordination
Beyond the underground utilities, our team will assess all overhead lines, including power and telecommunications cables, to plan our rigging and felling strategy. Please let us know if the crew will have access to an outdoor water spigot for dust control or an electrical outlet if needed. We also recommend scheduling your tree removal on a day that won't conflict with other services like trash collection or mail delivery to ensure clear, unobstructed access for everyone.
Our commitment to a seamless process includes helping you coordinate these critical details. If you have any questions about safety logistics, contact our team for a consultation and we will walk you through every step.
Post-Removal Planning: Stumps, Debris, and Restoration
Once the tree is safely on the ground, the project enters its final, critical phase: cleanup and restoration. A successful tree removal doesn't end with the last cut; it ends when your property is clean, safe, and ready for what comes next. Thinking through these final steps is a vital part of how to prepare your property for tree removal, as decisions made now will affect the cost, timeline, and final appearance of your landscape.
Before the CDA TREE AND UTILITY crew even arrives, it’s essential to have a clear plan for the stump and the resulting debris. Will you require stump grinding or a complete stump removal? A full removal involves excavating the entire root ball, a labor-intensive process necessary for new construction or foundations. More commonly, clients opt for stump grinding, where a specialized machine grinds the stump 4 to 6 inches below ground level, allowing for topsoil and sod to be placed over it. This choice directly impacts the equipment we bring and the final quote.
Similarly, you need a plan for the mountain of wood chips a large tree can generate. We offer two straightforward options:
Complete Haul-Away: Our team can remove every last chip, leaving your property pristine. This is the most hands-off solution for homeowners who want a perfectly clean slate.
On-Site Mulching: You can keep the wood chips for your own use. They make excellent, nutrient-rich organic mulch for garden beds and around other trees, helping retain soil moisture and suppress weeds.
At CDA TREE AND UTILITY, we discuss these options with you during the initial consultation. Our commitment is to make the entire process seamless from start to finish, which includes a comprehensive cleanup plan that aligns with your goals and budget. We ensure there are no surprises, just a clean and restored property.
Stump Grinding Logistics
If you choose stump grinding, a little preparation ensures an efficient process. Clear any rocks, landscape lighting, or decorative stones from the immediate area around the stump. It's also crucial to communicate your future plans for the spot. If you intend to plant a new tree, we'll need to grind the stump deeper, typically 12 to 18 inches, to make room for a new root system. The resulting mixture of soil and wood shavings can be used to fill the hole or be hauled away.
Final Site Restoration
The final step in how to prepare your property for tree removal is planning the restoration. After our team removes the heavy debris and levels the area, your lawn may show minor signs of compression from our equipment. A simple application of topsoil and grass seed or a fresh patch of sod will have the area looking new in just a few weeks. Ready for a seamless experience? Contact CDA TREE AND UTILITY for a professional removal quote and let our team manage every detail with expert care.
Make Your Tree Removal Seamless from Start to Finish
You now have a clear roadmap for a successful tree removal. By clearing the drop zone and addressing PNW-specific permits ahead of time, you've already handled two of the biggest hurdles. This proactive approach is the core of how to prepare your property for tree removal, ensuring a safe and efficient project for everyone involved.
But preparation is only half the job. For a truly seamless process, you need a trusted partner. With CDA Tree, you're partnering with a team backed by decades of hands-on experience in the Pacific Northwest. We manage the entire project, from securing permits to the final cleanup, and we stand by our 'on time, every time' promise.
Ready to see how our full-service arbor care can make your project effortless? Get a Fast, Fair Tree Removal Quote from CDA Tree today. Let's work together to safely and beautifully transform your landscape.
Frequently Asked Questions
Do I need to be home while the tree is being removed?
No, you don't need to be present for the entire removal, but we do require you to be home when our crew first arrives. This initial 15-minute meeting allows us to walk the property with you, confirm the exact scope of work, and answer any last-minute questions. Once the job plan is confirmed with our crew leader, you are free to go. We are fully insured and committed to making the process seamless from start to finish.
Will the tree removal equipment damage my driveway or lawn?
Our team takes extensive, professional precautions to prevent property damage. We use specialized 4-foot by 8-foot ground protection mats that distribute the weight of our equipment, protecting over 95% of the lawn area we access. For driveways, our lifts use outrigger pads to prevent cracking or scuffing on concrete and asphalt surfaces. Our goal is to leave your property in excellent condition with minimal impact on your landscape and hardscapes.
Should I call the utility company before the tree crew arrives?
No, you don't need to contact the utility companies yourself. As part of our comprehensive service, we handle all necessary coordination. Before any project begins, our team makes the required call to the 811 "Call Before You Dig" service to have all underground utility lines professionally marked. This is a critical safety step we manage to ensure a safe and efficient job, giving you complete peace of mind.
How long does it typically take to prepare a property for a large removal?
For most homeowners, preparing for a large tree removal takes between 30 and 90 minutes. This preparation primarily involves clearing a 20-foot radius around the tree's base of any movable items like patio furniture, grills, vehicles, and potted plants. Following this step is a crucial part of how to prepare your property for tree removal, as it provides our crew with safe, clear access for our team and equipment.
What happens to all the wood and branches after the tree is cut down?
We process and haul away all debris unless you have made a specific request to keep the wood. Branches and smaller limbs are fed through a commercial-grade wood chipper on-site, and the resulting mulch is removed. Large logs are cut into manageable sections, loaded onto our trucks, and hauled away. We are committed to responsible stewardship; over 80% of the wood we remove is recycled into firewood or landscape mulch, not sent to a landfill.
Can I keep the wood for firewood, and should I tell the crew beforehand?
Yes, you can absolutely keep the wood for firewood, and it is essential that you tell us when you approve the job quote. Informing us beforehand allows us to include this in our work plan and provide accurate pricing. Our crew can cut the trunk and larger limbs into standard 16-inch firewood lengths for you. Please let us know where on your property you'd like the wood stacked so we can work efficiently to meet your needs.
Is it necessary to notify my neighbors before a tree removal?
While not legally required in over 90% of residential situations, we strongly recommend giving your immediate neighbors at least 24 hours' notice as a professional courtesy. The work involves loud equipment like chainsaws and chippers, and our trucks may temporarily occupy street space. A friendly heads-up helps maintain good relations and allows them to move vehicles or keep pets inside. It ensures a smoother, more considerate process for everyone.
What should I do if the tree is near power lines?
You should never attempt to prune or work on a tree that is within 10 feet of a power line. The first and only step you should take is to call a qualified and insured tree care professional. Our team is specifically trained to work around energized lines, adhering to strict OSHA 1910.269 safety standards. We coordinate directly with the utility provider to ensure the job is completed with 100% safety for everyone involved.
Comments